To establish connectivity between the IP-PBX(A) FCM5600 and IP-PBX(B) FCM630A, we need to establish a connection between the two systems. This will allow extensions in both directions to communicate with each other.
IPPBX (A)
Model: FCM5600
Extensions Range from 1000 to 1009
Ip: 192.168.0.101
IPPBX (B)
Model: FCM630A
Extensions Range from 2000 to 2009
Ip: 192.168.0.102
NOTE!!!!! :Ensure that the extension numbers on both IPPBX are different. #
TOPOLOGY #

CONNECT FCM5600 TO FCM630A USING PEER SIP TRUNK #
Create SIP Trunk on FCM5600 #
– Login to FCM5600 Web GUI
Access the FCM5600 interface using your browser to configure PBX settings.
– Navigate to PBX Settings → Extensions/Trunks → Trunks
Open the section where all existing SIP trunks are listed and managed.
– Click “Add” to configure a new trunk
Start creating a new peer SIP trunk to connect with another PBX or remote system.

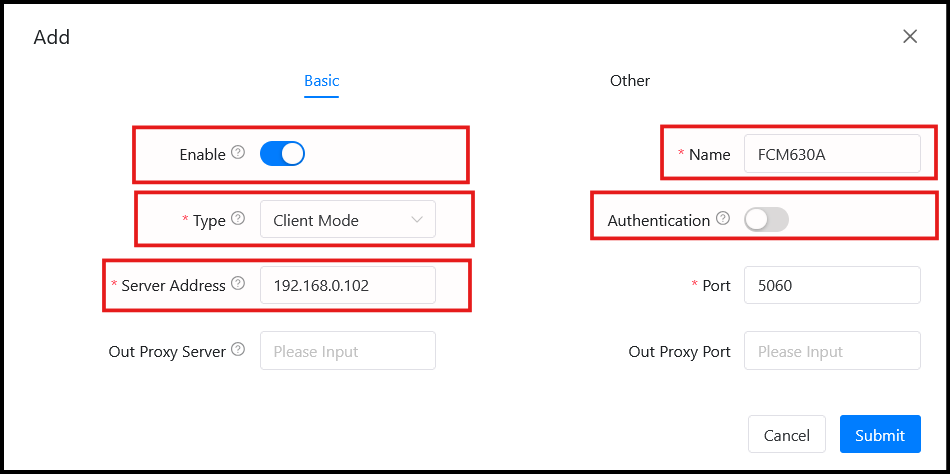
To establish a peer SIP trunk between FCM5600 and FCM630A
– Name: FCM630A (any Name)
Assign a unique name or number to identify this SIP trunk.
– Type: Client mode
Set the trunk to operate in server mode to accept incoming registrations from the peer PBX.
– Authentication: Disable
Turn off authentication to secure the SIP trunk without a username and password.
– Server Address: IP of PBX (e.g., 192.168.0.102)
Enter IP of FCM630A to connect this PBX with another one
A new trunk has been configured
ON FCM630A #
Create SIP Trunk on FCM630A #
– Login to FCM630A Web GUI
Access the FCM630A interface through your browser to configure PBX settings.
– Navigate to Extensions/Trunks → VOIP Trunks
Open the section where all existing VoIP/SIP trunks are listed and managed.
– Click “Add SIP Trunk” to configure a new trunk
Start creating a new peer SIP trunk to connect with another PBX or remote system.

Establish a Peer SIP Trunk Between FCM630A and FCM5600
– Trunk Type: Peer SIP Trunk
Ensure the trunk type is set to “Register SIP Trunk” to allow registration with the peer PBX.
– Trunk Name: FCM5600
Enter a clear name to identify this SIP trunk between FCM630A and FCM5600.
– Host Name
Enter the IP address and port of FCM5600 (e.g., 192.168.0.101) to define the destination for the SIP trunk.

– Press “Save” and then “Edit.”
Save the initial trunk configuration and reopen it for further advanced settings.
– Navigate to Advanced Settings
Open the section containing additional trunk options.
– Enable Heartbeat Detection
Check the box for Enable Heartbeat Detection to continuously monitor the trunk status and ensure the connection with the peer PBX is active.

– To know the status of the trunk in FCM5600, navigate to System Status → Dashboard
Access the Dashboard to check the current status of all trunks, including registration state, connectivity, and any errors.

– To know the status of the trunk in FCM630ِِA, navigate to System Status → Dashboard
Access the Dashboard to check the current status of all trunks, including registration state, connectivity, and any errors.

A new trunk has been configured
CALL ROUTING ON FCM5600 #
Configure Outbound Routes on FCM5600 #
– Navigate to PBX Settings → Outbound Control → Dial Rules
Open the Dial Rules section to create a new outbound calling rule.
– Click “Add”
Start creating a new dial rule.
– Rule Name: To PBX
Enter a clear name for the rule, for example, to identify that this rule will route calls to the peer PBX.
– Click “Submit” to save the rule
Save the basic dial rule configuration before adding dial pattern details.
– Click the “+” button under the rule name
Add the dial rule details that define which numbers will use this route.
– Dial Pattern: 200x
Use this pattern to allow calls to extensions matching 2000–2009.
– From “Available Trunks”, select trunk “FCM630A”
Choose the SIP trunk that will be used to route calls matching this dial pattern.
– Click “Submit” to save
Save the dial rule details.
– Click “Apply Changes”
Apply the configuration changes to activate the dial rule.
– Make sure all IPPBX extensions can use this dial rule
Verify that the required extensions have permission to use this outbound rule when calling the peer PBX.

A new route has been configured.
Configure Inbound Routes on FCM5600 #
No configuration needed
Inbound routes are already handled by the DID settings, so no additional setup is required.
CALL ROUTING ON FCM630A #
Configure Outbound Routes on FCM630A #
– Navigate to Extension/Trunk → Outbound Routes
Open the Outbound Routes section to create a new outbound calling rule.
– Click “Add”
Start creating a new outbound route.
– Route Name: To FCM5600
Enter a clear name for the route to identify calls going to FCM5600.
– Pattern: 100x
Set the dial pattern to match extensions 1000–1009.
– From “Privilege Level”
Select the privilege level assigned to the extensions allowed to use this route.
– From “Main Trunk”
Select trunk FCM630A as the outbound path for this route.
– Click “Save”
Save the outbound route configuration.
– Click “Apply Changes”
Apply the changes to activate the route for all eligible extensions.


A new route has been configured.
Configure Inbound Routes on FCM630A #
– Navigate to Extension/Trunk → Inbound Control
Open the inbound routing section to manage incoming calls.
– Choose the SIP Trunk FCM5600 and click “Add”
Select the trunk that will handle inbound calls from FCM5600 and add it to the inbound route configuration.

– Name: IN_FCM5600_FRC
Assign a clear name to identify the inbound route from FCM5600 via FRC.
– Pattern: 200x
Define the dial pattern that matches the extensions receiving calls from the peer PBX.
– Destination: By DID
Route incoming calls using Direct Inward Dialing (DID).
– Allowed DID Destination: Extension
Specify which internal extension(s) are allowed to receive these incoming calls.


A new route has been configured.


