To establish connectivity between IP-PBX (A) FCM5600 and IP-PBX (B) FCM630A, we need to create a direct link between the two systems. This will allow extensions on both sides to communicate with each other seamlessly. By using FRC (FIBERME Remote Connect), the extensions on both IP-PBXs will be able to make calls without requiring the systems to be on the same LAN, as the connection will be handled through the cloud.
IPPBX (A)
Model: FCM5600
Extensions Range from 1000 to 1009
IPPBX (B)
Model: FCM630A
Extensions Range from 2000 to 2009
NOTE!!!!! : Ensure that the extension numbers on both IPPBX are different. #
TOPOLOGY #
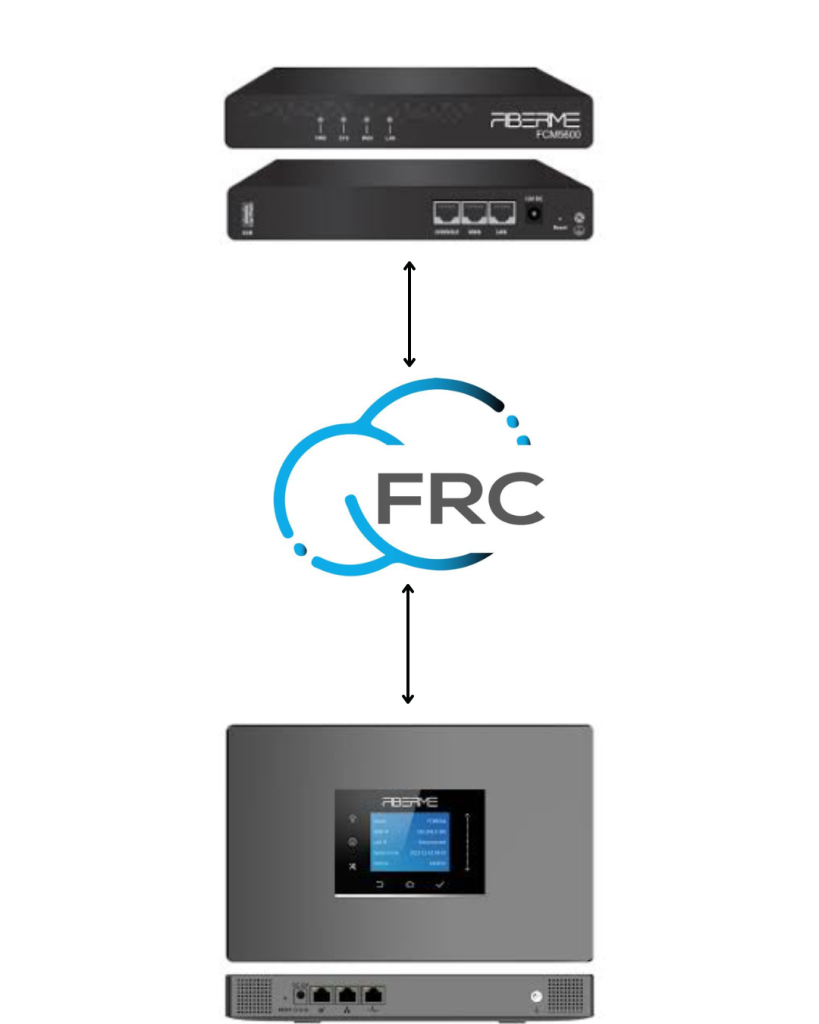
1- CONNECT FCM5600 TO FCM630A USING PEER SIP TRUNK #
1.1- Create SIP Trunk on FCM5600 #
Login to FCM5600 web GUI.
On FCM5600 web GUI, to create a peer SIP trunk, navigate to “PBX Settings-> Extensions/Trunks -> Trunks” and then click “Add” to configure a new trunk.

To establish a peer SIP trunk between FCM5600 and FCM630A,
– Name: 2323(any number)
– Type: Server mode
– Authentication: enable
– Out Proxy Server: Write your domain (yourcompanyname.fiberme.cloud )
– Out Proxy Port: 5162
– Username: 2323 (same name of Trunk )
– password:2323 (same name of trunk)

– Transport Protocol: TLS
– From Domin: Write your domain (yourcompanyname.fiberme.cloud )

A new trunk has been configured.
1.2- Create SIP Trunk on FCM630A #
Login to FCM630A web GUI.
On FCM630A web GUI, to create a peer SIP trunk, navigate to “Extensions/Trunks” and then navigate to” VOIP Trunks.” Click “Add SIP Trunk” to configure a new trunk.

To establish a peer SIP trunk between FCM630A and FCM5600
– Type: Register SIP Trunk
– Provider Name: 2323 (same name of trunk in FCM5600)
– Host Name: Write your domain:5162 (yourcompanyname.fiberme.cloud:5162 )
– Transport: TLS

– From Domain : yourcompanyname.fiberme.cloud
– Trunk Registration Number: 2323 (same name of trunk in FCM5600)
– Password: 2323 (same name of trunk in FCM5600)
– AuthID: 2323 (same name of trunk in FCM5600)
– AuthTrunk: enable

– Enable Heartbeat Detection

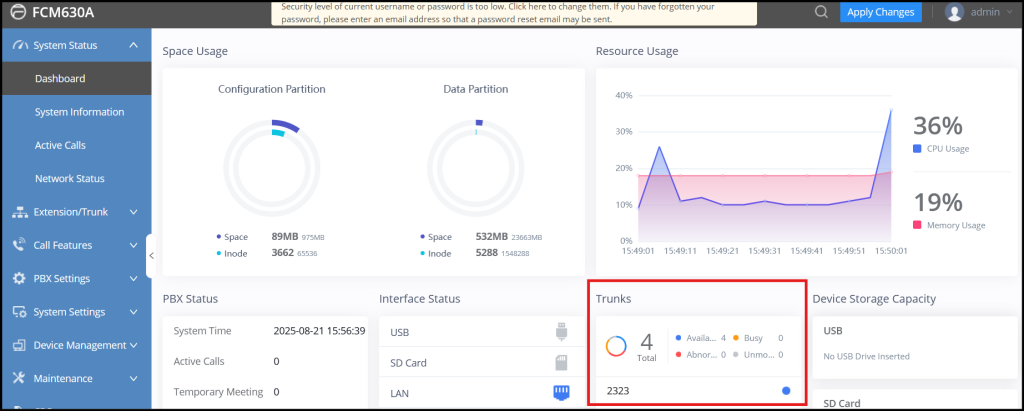
To know the status of trunk in FCM5600, navigate to “System Status -> Dashboard“

To know the status of trunk in FCM630A, navigate to “System Status -> Dashboard“
2- CALL ROUTING ON FCM5600 #
2.1- Configure Outbound Routes on FCM5600 #
Navigate to “PBX Settings -> Outbound Control -> Dial Rules” then click on “Add” Button, then give a name to this rule (Example: To PBX), and press “Submit” to save the rule.
Rule name will be listed, click on “+” button under the rule name to add Dial Rule details, and use the following information:
– Dial Pattern: 200x
– From “Available Trunks” select the trunk “2323“
– Click on “Submit” to save
– Click on “Apply Changes”
Please be sure that all extensions in IPPBX can use this dial rule.

A new route has been configured.
2.2- Configure Inbound Routes on FCM5600 #
There is no need to configure inbound route because it is already configured by DID.
3- CALL ROUTING ON FCM630A #
3.1- Configure Outbound Routes on FCM630A #
Navigate to “Extension/Trunk -> Outbound Routes”, then click on “Add” Button
then give a name to this rule “To FCM5600”,
– Pattern: 100x
– From “Privilege Level” select the privilege level of extension .
– From “Main Trunk” select the trunk “2323“
– Click on “save” to save
– Click on “Apply Changes”
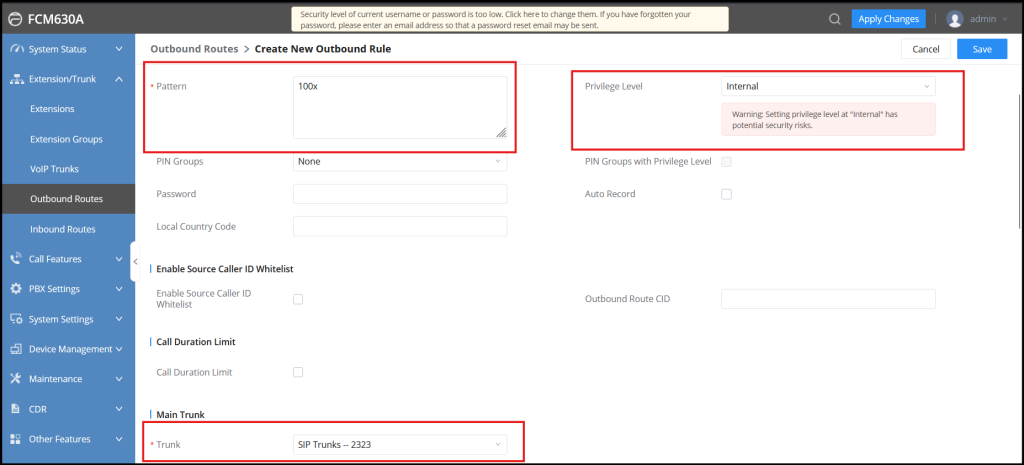
A new route has been configured.
3.2- Configure Inbound Routes on FCM630A #
Navigate to “Extension/Trunk -> inbound Control” then choose the SIP Trunk FCM5600 and click Add

To set an inbound route, you need to determine some credentials:
1. Name “ IN_FCM5600_FRC”
2. Pattern “ 200x “
3. Destination “By DID”
4. Allowed DID Destination “ extension “

A new route has been configured.


